
Pumpkin Painting- the Art of Pumpkin Marbling
What you’ll need:
Small pumpkins, and gourds (white or light colored ones work best)
Nail polish (choose your favorite colors!)
Shallow container or large bowl (big enough to fit your pumpkins)
Warm water
Plastic bag
Toothpicks or skewers
Paper towel
What will make the activity better:
Friends!
Gloves (to keep your hands clean)
Sealer Spray
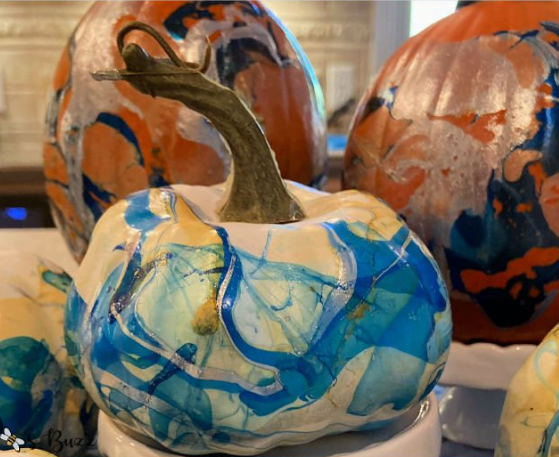
As autumn approaches, it’s time to embrace the seasonal spirit with a creative twist on the traditional pumpkin carving. This year, why not try your hand at pumpkin painting using a marbling technique? It’s a fun and easy way to create unique, colorful designs on small pumpkins or gourds that will brighten up your fall decor. Here’s how to do it!
Instructions
Step 1: Prepare Your Workspace
Start by laying down a plastic sheet or tarp to protect your workspace from spills. Gather all your materials and set them up so you can easily reach them. This will make the process smoother and more enjoyable!
Step 2: Fill the Container with Water
Fill your shallow container with warm water, leaving enough space for the pumpkins to be submerged without overflowing. The water temperature is essential because it helps the nail polish float on the surface.
Step 3: Prepare the Nail Polish
Choose a few nail polish colors that complement each other. Carefully pour a small amount of each color onto the surface of the water. You can create a layered effect by adding drops of different colors, letting them spread out and float. Remember, a little goes a long way!
Step 4: Swirl the Colors
Using a toothpick or skewer, gently swirl the colors together to create interesting patterns. Be careful not to overmix, as this can muddy the colors. The goal is to create a beautiful marbled effect.
Step 5: Dip the Pumpkin
Once you're satisfied with your design, it’s time to dip the pumpkin! Wearing gloves, hold a small pumpkin by the stem and slowly dip it into the water, letting it touch the nail polish. You can submerge the pumpkin completely or just partially, depending on the look you want. The polish will cling to the surface, creating a stunning marbled design.
Step 6: Dry the Pumpkin
Carefully lift the pumpkin out of the water and place it on a paper towel or newspaper to dry. The design will be delicate at this stage, so handle it gently. Allow the pumpkin to dry completely before touching or moving it too much.
Step 7: Repeat the Process
If you have more pumpkins to decorate, repeat steps 3 to 6 with different colors and patterns. Feel free to experiment with various color combinations and designs!
Step 8: Seal Your Creation (Optional)
If you want your designs to last longer, consider applying a clear sealer spray once the pumpkins are completely dry. This will help protect the paint from chipping and fading.
Marbling pumpkins is a delightful and creative way to celebrate the fall season. Not only do you end up with stunning decor, but you also have a fun activity that can be enjoyed with family and friends. Each pumpkin will have its unique design, making them perfect conversation starters at your autumn gatherings. So gather your supplies, unleash your creativity, and enjoy the vibrant world of pumpkin marbling! Happy crafting!